

Collaboration is key to innovation, and Miro is the perfect tool to bring your team together — no matter where they are. From brainstorming ideas to building product roadmaps and running Agile workflows, Miro provides an all-in-one digital workspace. In this guide, we’ll walk you through everything you need to know to create, use, and share Miro boards effectively.
What is Miro?
Miro is an innovation workspace where teams can brainstorm, design, and collaborate on building ideas together. It provides a powerful space for collaboration — whether your team is working in the same room or across time zones. With an infinite canvas, built-in templates, and real-time/async tools, Miro makes it easy to bring creativity and strategy together in one shared space.
What is a Miro Board?
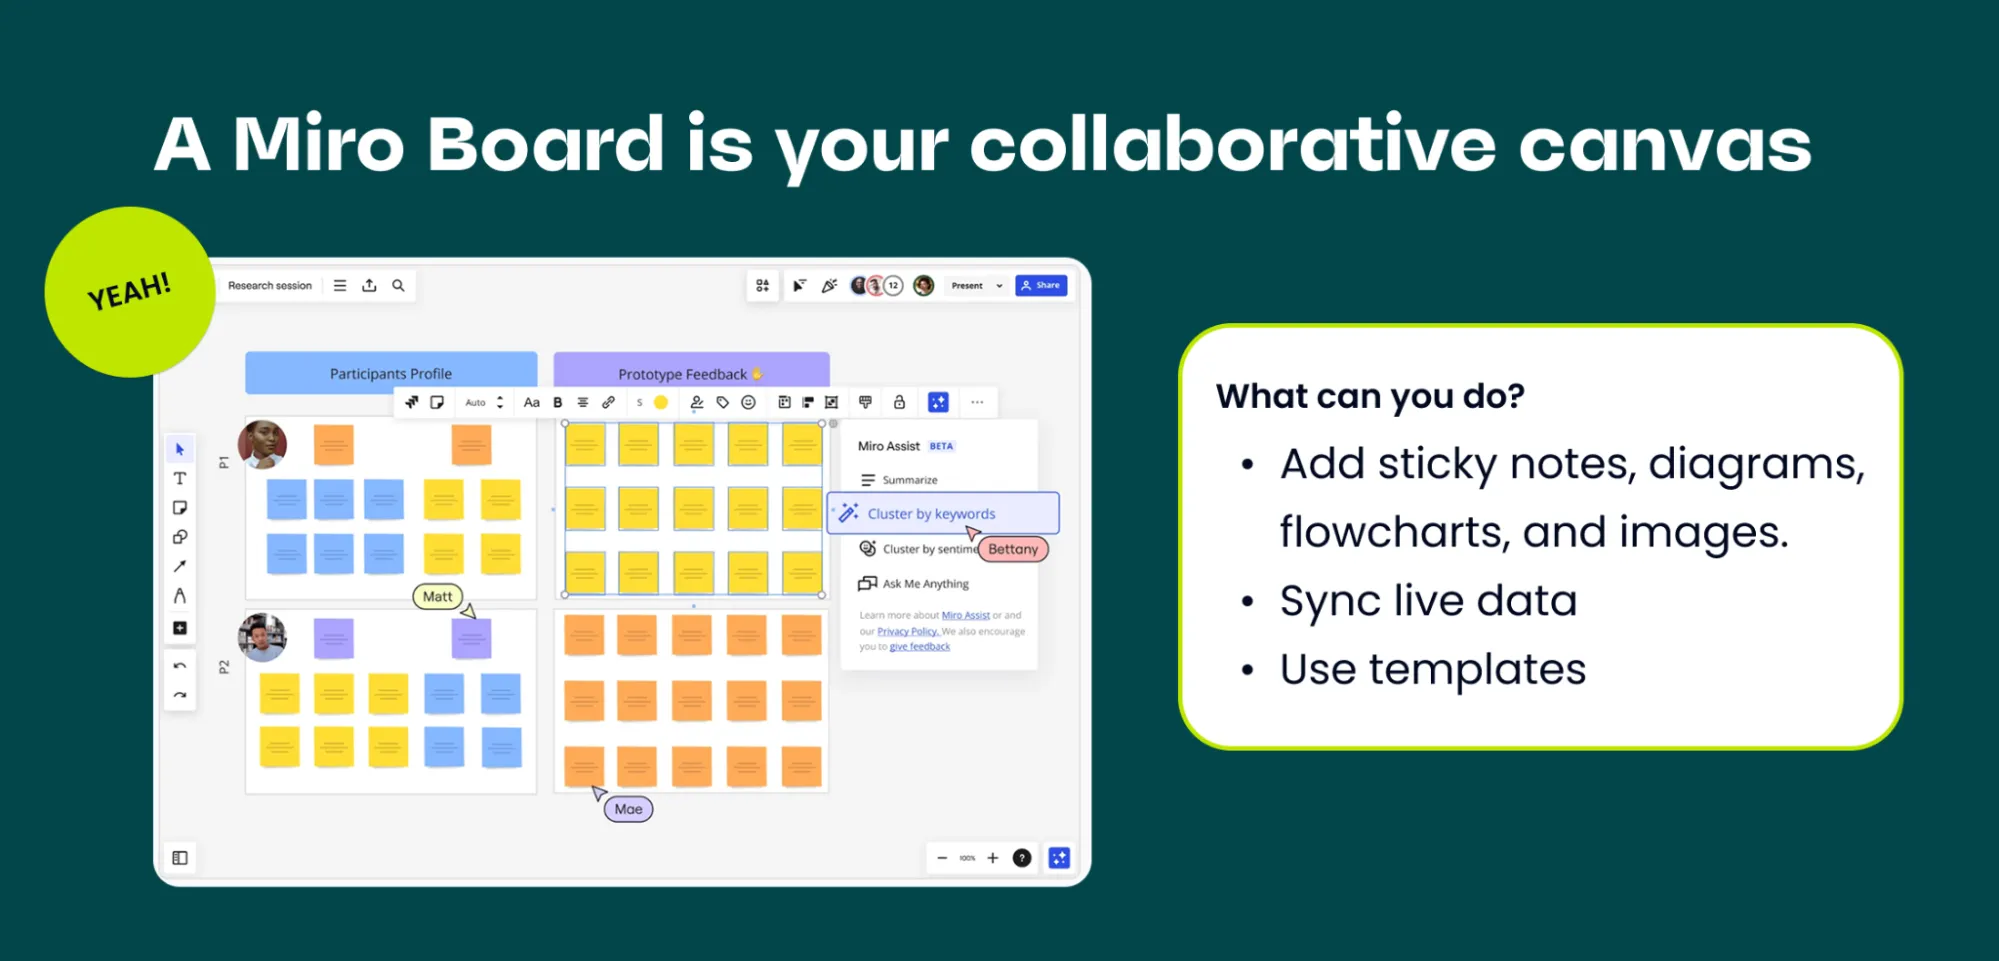
A Miro Board is your team’s collaborative canvas. On a board, you can:
- Add sticky notes, diagrams, flowcharts, and images.
- Sync live data from tools like Jira, Slack, and Asana.
- Use templates for Agile workflows, roadmaps, and customer journey maps.
Boards are highly flexible, supporting both quick brainstorming sessions and complex project management workflows.
How to Create a Miro Board
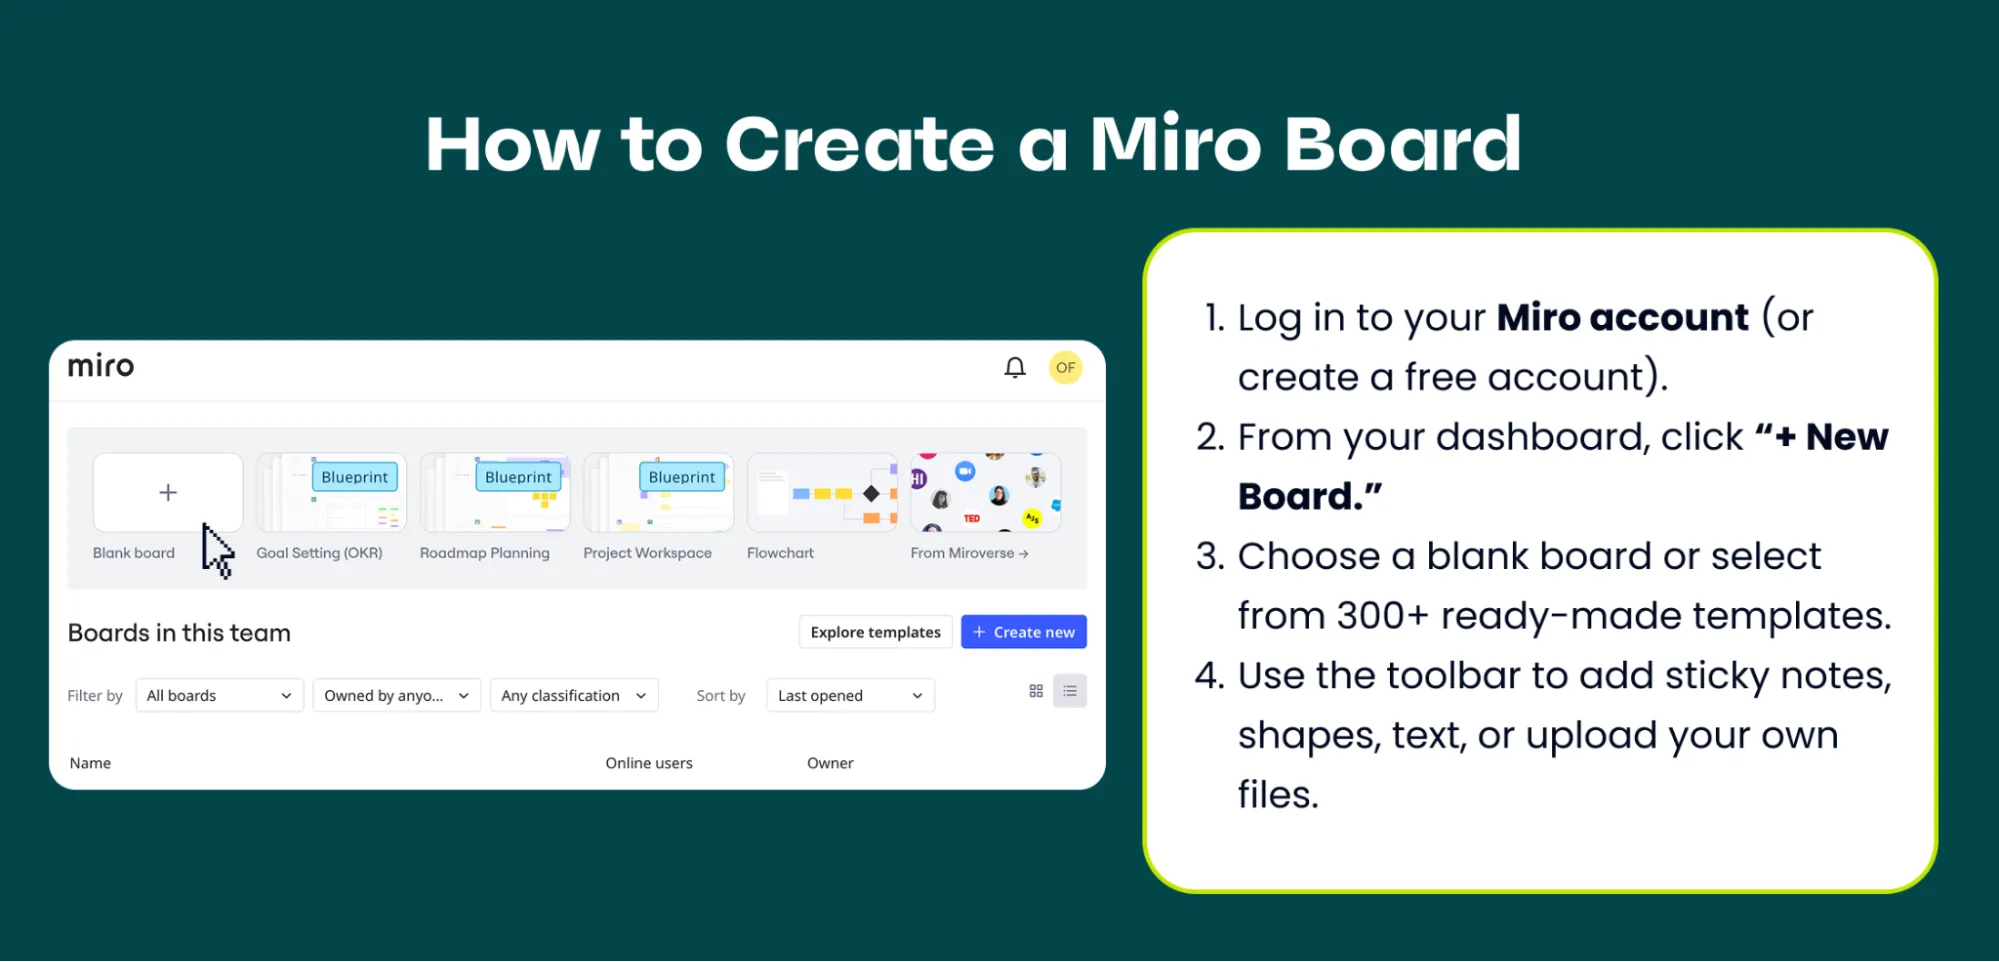
Getting started is simple:
- Log in to your Miro account (or create a free account).
- From your dashboard, click “+ New Board.”
- Choose a blank board or select from 300+ ready-made templates.
- Use the toolbar to add sticky notes, shapes, text, or upload your own files.
💡 Pro tip: Use our Free Agile Planning Template to kickstart roadmaps, sprints, or customer journey maps.
How to Use a Miro Board
Miro boards are versatile and can support many use cases:
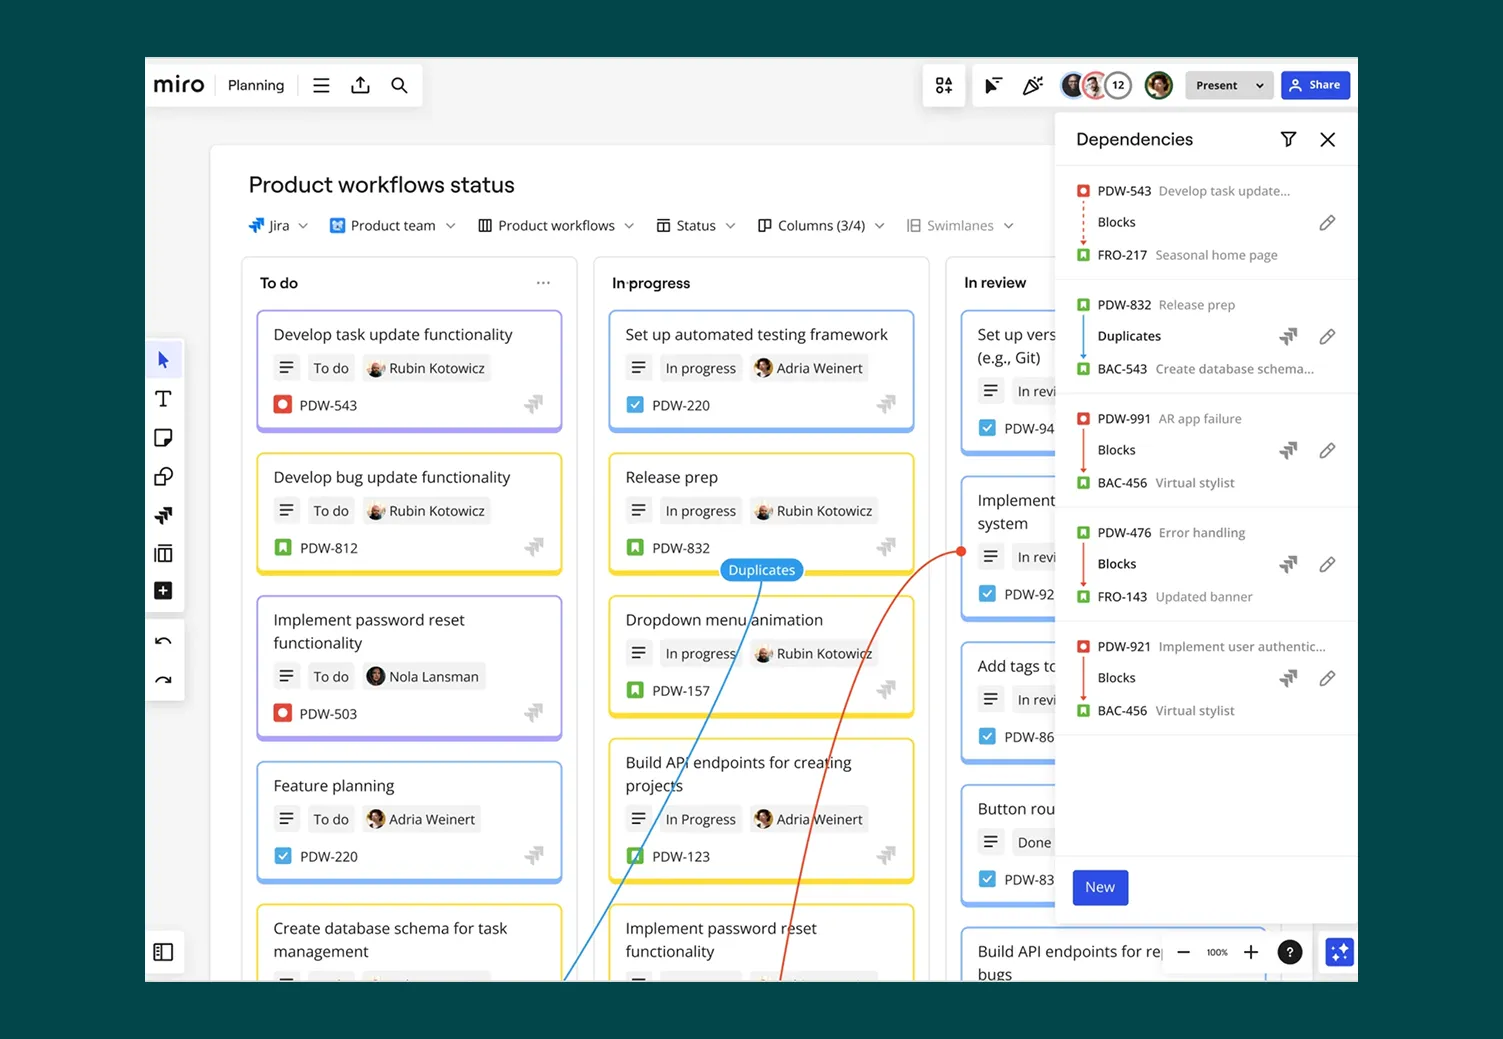
- Roadmapping: Visualize product strategy, timelines, and dependencies.
- Customer Journey Mapping: Understand user needs by plotting touchpoints.
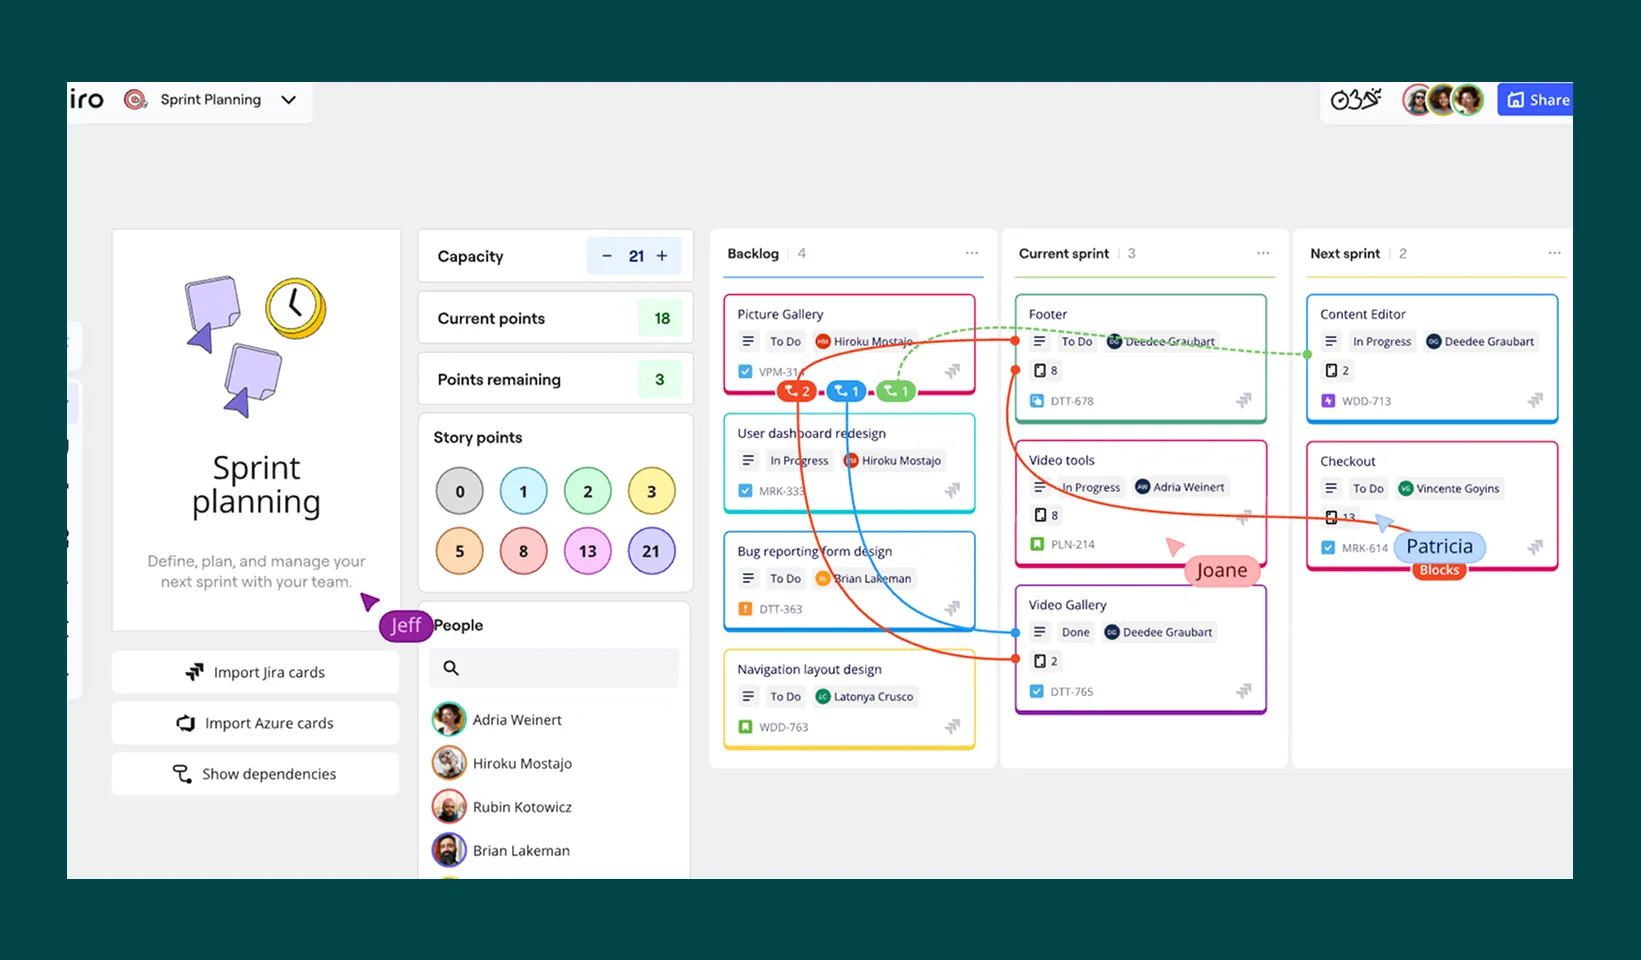
- Agile Planning: Run standups, retros, and sprint planning using online Scrum boards.
💡Pro Tip: Connect your Jira instance with Miro to see your Jira cards in Miro, and update Jira issues directly from your Miro board.
- Workshops & Brainstorming: Host interactive sessions with voting, timers, and comments.
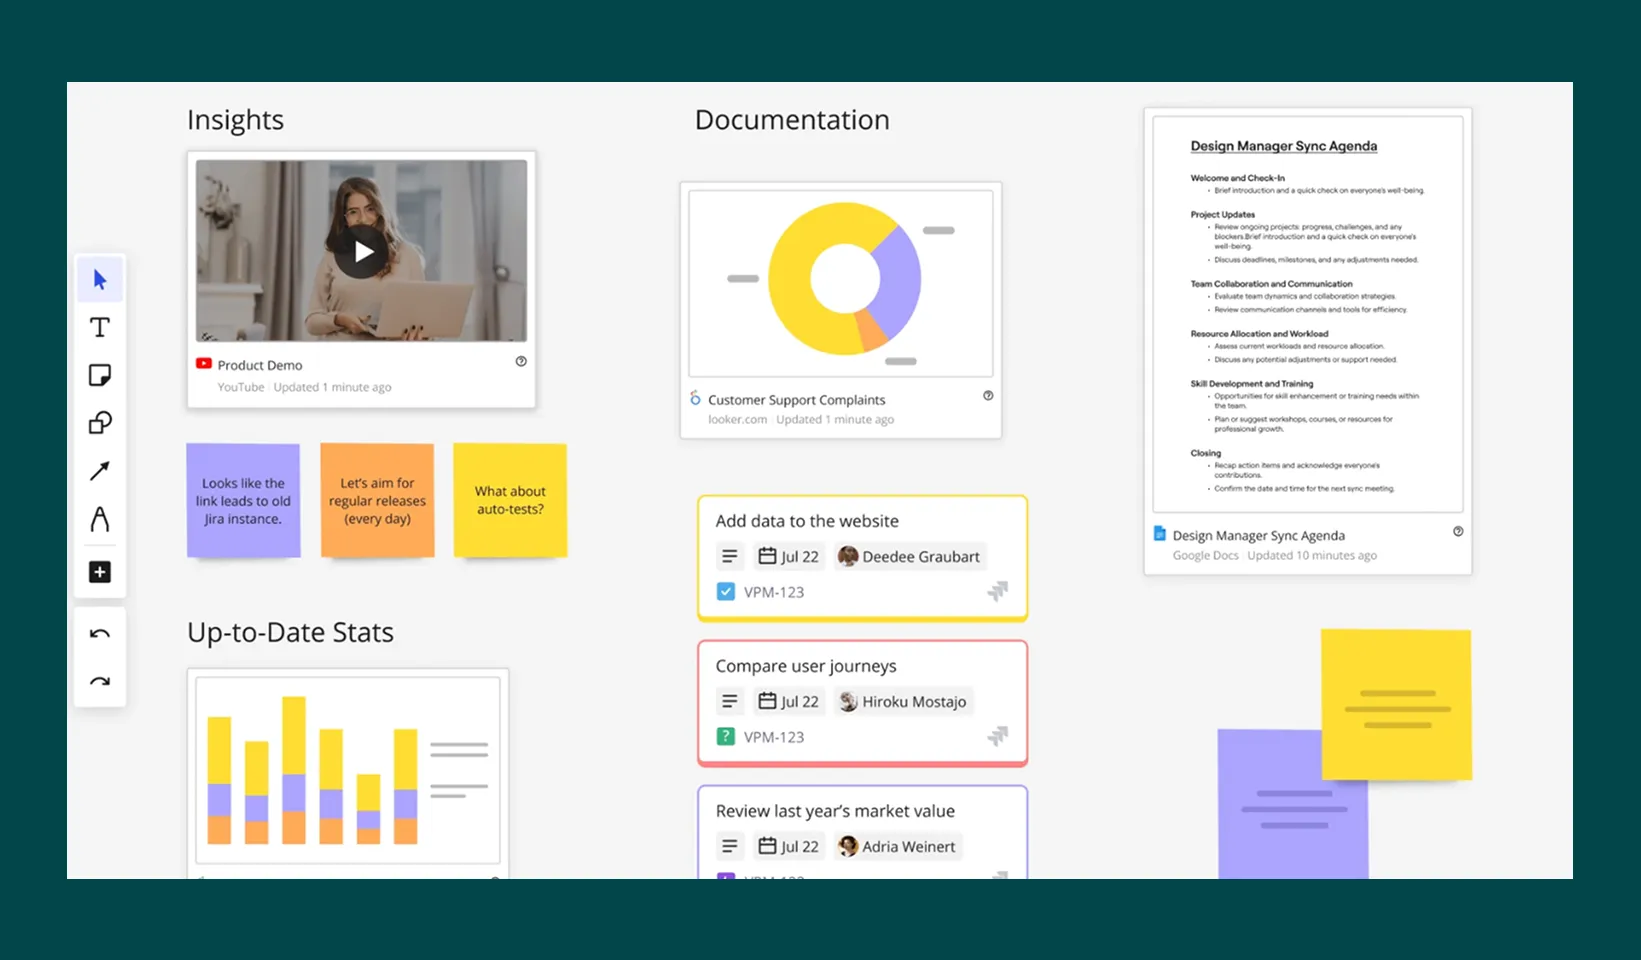
- Data and Content Visualization:
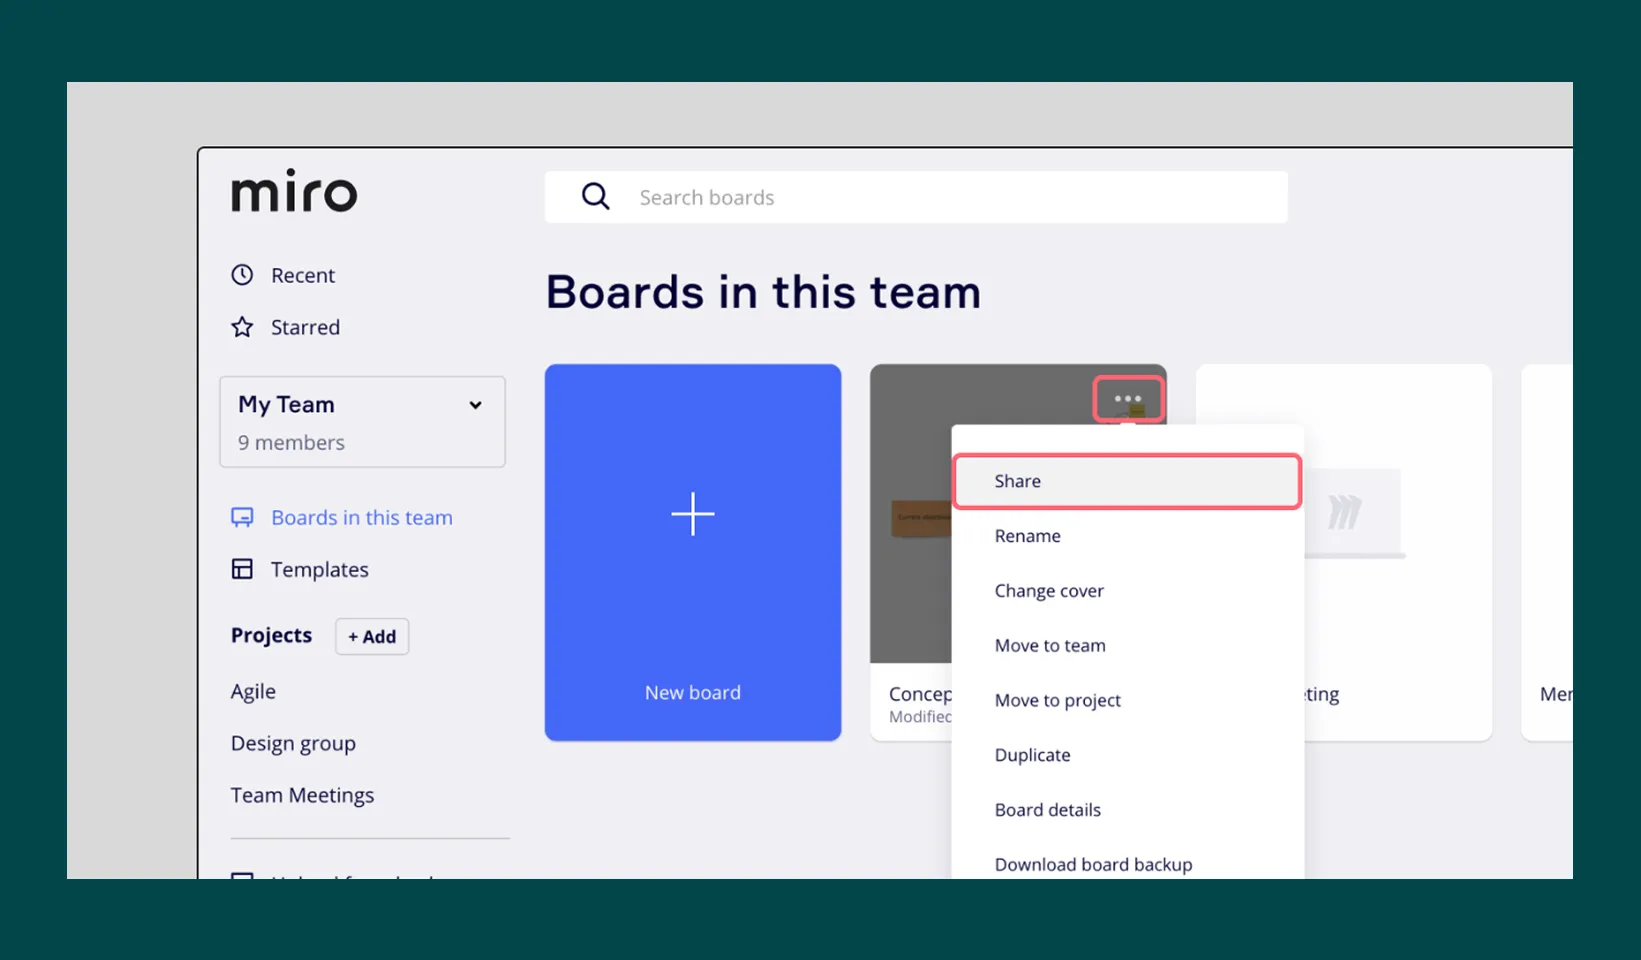
Sharing Settings for Miro Boards
Miro offers flexible sharing options to collaborate with team members, guests, and external stakeholders. Understanding these settings ensures you maintain control over who can access and edit your boards. By default, a Miro board can be shared in two ways: 1. from within the board, 2. from the dashboard
Board Access Rights
When sharing a board, you can assign different access levels:
- Can view: Users can only view the board.
- Can comment: Users can view and leave comments.
- Can edit: Users can view, comment, and make changes to the board.
Public Link Sharing:
- Click the Share button in the top-right corner of the board
- Under the Invite tab, go to Anyone with the link.
- Choose the desired access level (view, comment, or edit).
- Click the Copy board link and share it with your collaborators.
Team-Wide Sharing:
- Click the Share button in the top-right corner of the board.
- Under the Invite tab, go to Anyone at [team name].
- Choose the access level (view, comment, or edit).
- Click Send invitations.
Share with Guests:
- Click the Share button in the top-right corner of the board.
- Under the Invite tab, enter the email address of the guest.
- Set their access rights and click Send invitations.
There are additional ways a Miro board can be shared (e.g., through Slack), and you can always revoke access to a board revoke access to a board
How to Download and Export a Miro Board
You can easily download and export a Miro board as images, PDFs, or CSV files, which can then be easily shared with colleagues and clients.
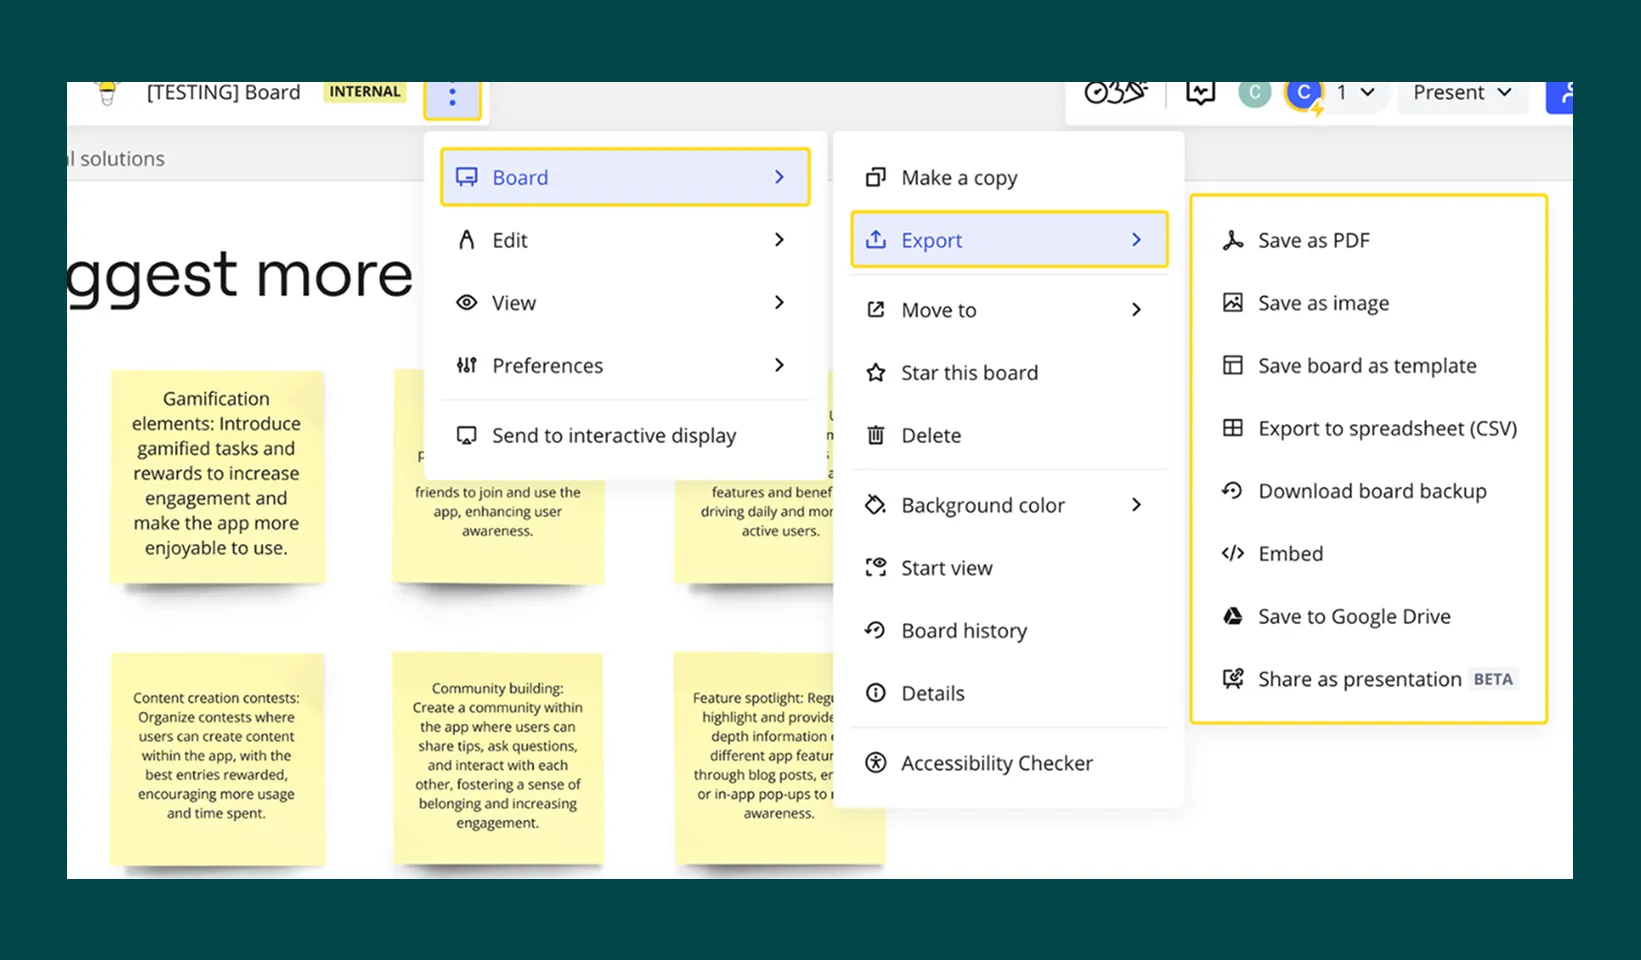
Export Instructions
-
Open the Export Menu
- Click the three dots
(...)icon in the top-left corner of your board to open the export sub-menu.
- Click the three dots
-
Choose Your Export Format
- Save as Image: Export your board or selected frames as a JPG image.
- Save as PDF: Export your board or selected frames as a PDF document.
- Export to CSV: Export text content (e.g., sticky notes, cards, text boxes) into a CSV file.
- Embed link: Integrate your board into wikis or websites.
-
Select the Area to Export
- Whole Board: Select all objects using
Ctrl + A(Windows) or⌘ + A(Mac), then click the three dots on the context menu and select “Create Frame.” - Specific Frames: Select the individual frame you wish to export.
- Whole Board: Select all objects using
-
Adjust Export Settings
- Image Export: Choose image size (Small, Medium, Large, or Vector).
Note: Vector quality is saved as a PDF file.
- PDF Export: Choose between Small file size or Best quality.
- Image Export: Choose image size (Small, Medium, Large, or Vector).
Notes on Export Availability
Free Plan: Users on the Free plan can export boards in Small image size and PDF Small file size. Vector export is available only in Edge (version ≥79) and on Desktop apps.
Paid Plans: (Starter, Business, Enterprise, Education): These plans provide higher-resolution exports and additional features.
Browser Compatibility: Export options may vary depending on your browser. For optimal performance, use Google Chrome, Firefox, or Safari.
Device Compatibility: Exporting is supported on Desktop and Tablet apps. Mobile devices do not support exporting.
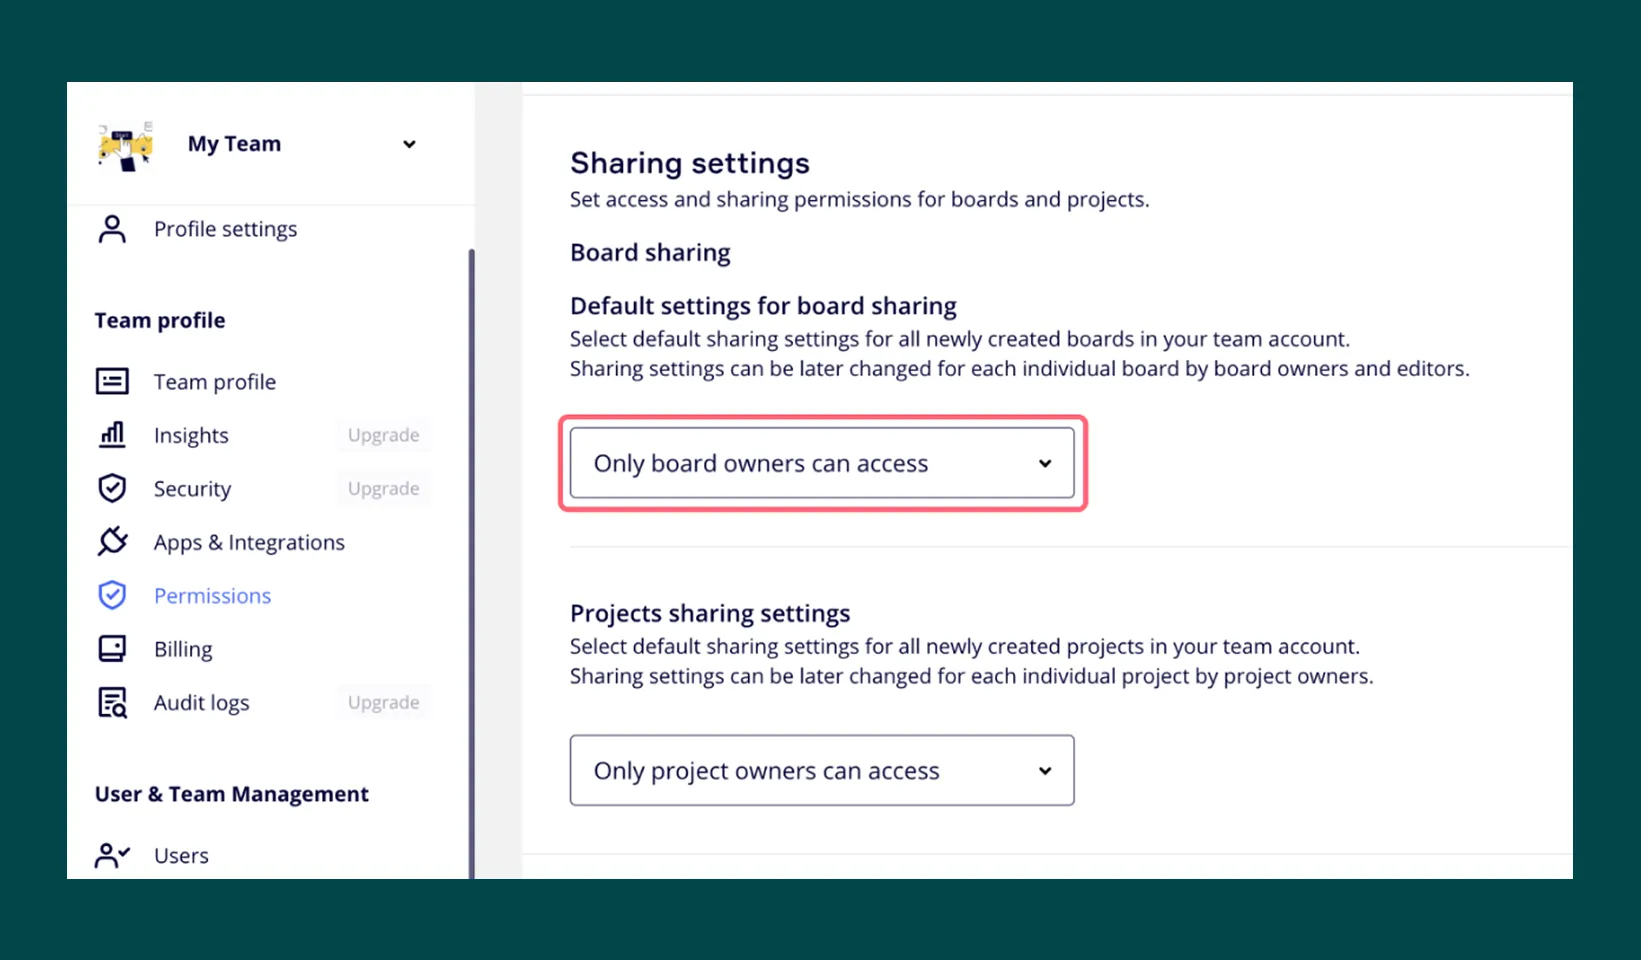
How to Make a Miro Board Private
🧑💼 For Admins: Set Default Sharing Settings (Optional)
If you are a Team or Company Admin on a Starter, Business, Enterprise, or Education plan, you can set all new boards to be private by default.
- Go to Team settings > Permissions > Sharing settings.
- Under Default settings for board sharing, select
‘Only board owner can access’.
🔍 Check the board’s location
Before creating a board, check the location of the board.
If you create a board in a shared space, the board will automatically be shared with all members of that space.
🔒 Confirm Privacy Settings
After you create a board and it is shared with your team, you can open the Share dialog and set the team’s access level to
No Access.
Work With a Miro Partner
Want to get the most out of Miro? A Miro Solution Partner, such as Seibert, can help your team onboard, train, and design custom workflows tailored to your specific business needs. Learn more about working with a Miro Partner